Create your study
In Qualtrics, exactly as you normally would.
- Build your study as usual. Your questions stay exactly where they are.
- The gate is added in the Survey Flow, not on a page, so nothing about your instrument changes.
You now have: a normal Qualtrics study.
Create a verification and paste your Qualtrics link
In the VerifyYou dashboard.
- Click New verification and name the study.
- Under “Where does your survey live?” pick Qualtrics. That choice is how we know to create one-time codes in a contact-list file, the credential Qualtrics’s own Authenticator understands.
- Paste your Qualtrics link and click Create verification.
You now have: your study link (the one you share, your Qualtrics link stays private) and a ready-to-import contact list holding one one-time code per verified respondent.
Import the codes as a contact list
In Qualtrics’s Contacts (called XM Directory on newer accounts).
- Click Create Contact List and import the VerifyYou file as-is.
- Each row carries one code in the External Data Reference field. That field is the passcode slot.
You now have: a contact list where each code can authenticate exactly once.
Add the gate in Survey Flow
Open your study’s Survey Flow.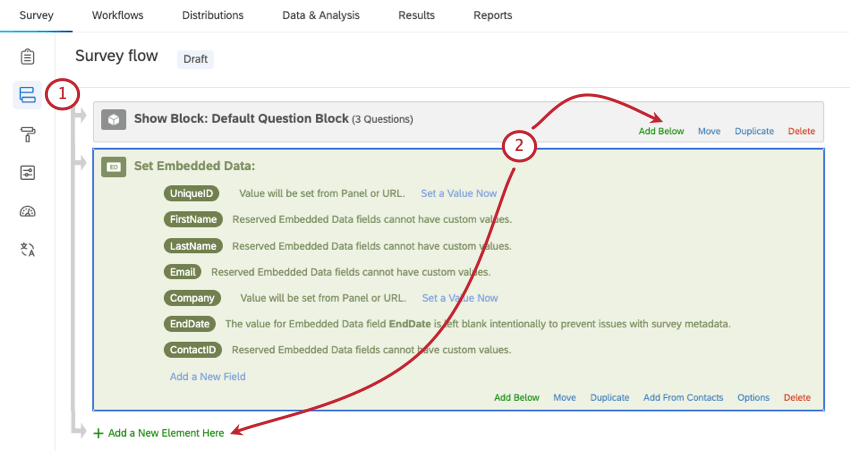
- Add an Embedded Data element at the very top, with the single field name
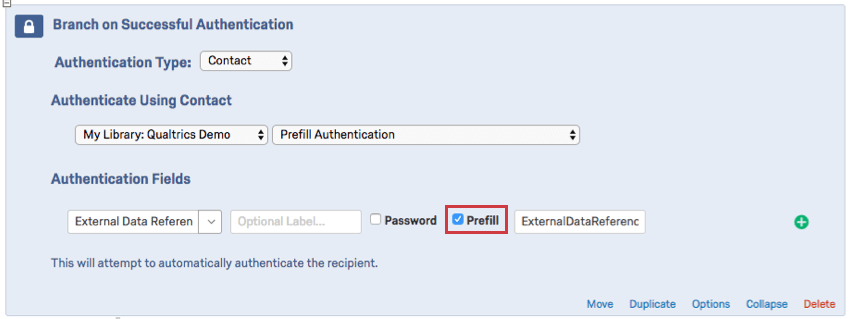
vy_codeand no value. Qualtrics then fills it from each respondent’s link, their documented query-string mechanism: the field should read “Value will be set from Panel or URL.” - Add an Authenticator element beneath it. Authenticate against your imported contact list on External Data Reference, tick Prefill, and point it at
vy_code. Leave “Allow authenticating respondents to retake authenticated section” unchecked, which is the default: that is what makes each code one-time. - Drag your survey blocks inside the Authenticator.
- After the Authenticator, add a Branch for anyone who falls through without authenticating, ending in its own End of Survey element marked as screened out. Qualtrics records a failed authentication as a complete by default, so this branch is what keeps failed and duplicate visitors out of your data.
You now have: a gate that opens itself for verified respondents and routes everyone else to a screen-out.
License note. Free Qualtrics accounts do not include contact lists, so this flow needs a standard or university license, which is what most institutions provide. If the Authenticator element does not appear in your Survey Flow options, your Qualtrics brand administrator can enable it.